ABSTRACT
A new non-contacting stress measurement system, the ACSM Stressprobe, has been developed for use in the offshore industry. The system can be used to measure both static and cyclic stress. The background to this development, laboratory trials and typical applications are described. Typical applications include bolts used in subsea clamps, beams and pipes or tubes.
INTRODUCTION
The stress level experienced by a structural member is the primary engineering design factor controlling safe use in service. In the past, engineers have had to rely on theoretical stress analysis or the use of Finite Element analysis to give stress values for design purposes. However, given the uncertainties that exist about service loading, boundary conditions, and build quality, in service stresses can not be predicted accurately.
In order to ascertain the magnitude of in-service stress levels accurately it is necessary to consider field measurements. In-service stress levels are the best indicators of the safety margin for a structure and whether it is likely to survive the design life. Strain gauges are possible for this work but are cumbersome if a stress distribution is required (in order to unravel the nature of the loading), do not measure locked-in stress and often require installation before the component is put into service.
It would be advantageous to have a non-contacting stress measurement system which could be installed at any time and which could be moved around the component to get peak stresses and stress distributions. ACSM offers the prospect of such a device for both static and cyclic stress measurement.
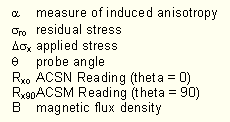
NOMENCLATURE
THE ACSM TECHNIQUE
Mechanical stress can influence the magnetic domain distribution in ferrous metals. This feature, known as piezo-magnetism can be utilised to determine changes in the stress state on the surface of a metal.
The physical background of the stress effect on magnetism is that the application of mechanical stress changes the magnetic property by movement of domain walls or rotations of domain magnetisation. The directional nature of the stress and magnetic fields produces stress-induced anisotropy. The magnetisation in the tensile stress direction or perpendicular to the compressive stress direction is enhanced at the expense of the other two directions. The change in magnetisation is believed to influence the magnetic permeability.
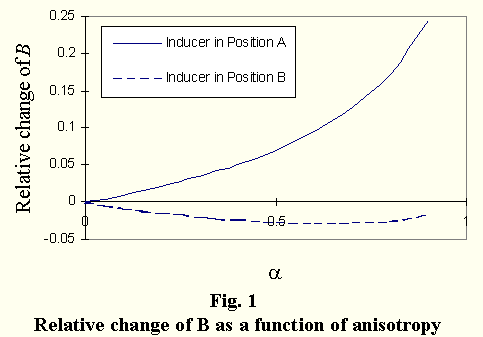
Mathematical models have been established Zhou and Dover [1] to provide an analytical solution of electromagnetic induction involving the effect of stress on permeability. For a solenoid inducer placed above a component perpendicular or parallel to the principal tensile stress axis, the magnetic flux density field variation (B) on the component surface can be predicted and shown to be dependent on the degree of induced anisotropy (alpha). Figure 1 shows the theoretical solution for the change in B as a function of anisotropy and this has been found to agree well with experimental data.
The degree of anisotropy found as a result of stress is at most about 0.25 and hence only the first parts of the curves in Figure 1 are used. In essence the behaviour is almost linear and the theoretical solutions have proved to be very useful in probe design.
More recent work [2] has shown that the use of two perpendicular inducing coils will give a combination of the two curves shown in Figure 1 resulting in a single almost straight line relationship which is applicable for both tensile and compressive stress. In practice the probe output needs to be calibrated for a particular material in order to interpret the stress level. A library of ACSM materials response has been established over the last few years.
APPLICATIONS
Static stress
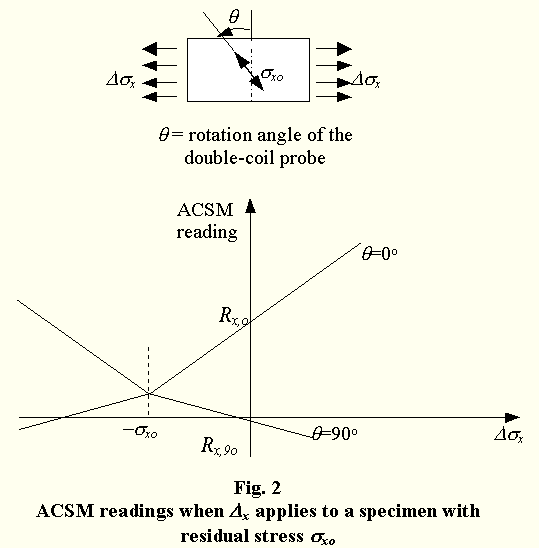
The measurement of static stress is often complicated by the presence of residual stress. This has led to the development of methodology, which allows the separation of the measurements into applied load and residual stress. Models have been developed [2] showing the influence of residual stress on ACSM measurements. Figure 2 shows in principle the effect of a residual stress and it has been found that a suitable range of measurements can be made in order to determine both components of stress. The nature of these measurements varies with the application being considered. So far ACSM has been applied to plates, beams, pipes and bolts. Some of the results from this work are described below.
Preload in bolts
Bolted clamps are used offshore for repair, attachments, and anchoring. Often the bolts are long and the stressed portion can be accessed for the purposes of ACSM measurement. In these circumstances ACSM stress measurement is possible and has been conducted subsea in the North Sea.
Clamps operate efficiently when the bolt load is at the design load. In service the design load is often produced using hydraulic pullers attached to the free end of the threaded member. During service the bolt loads may change and it is necessary that, periodically, the load must be checked. ACSM has been used for bolt checking following system approval by Bureau Veritas. The ACSM stress probe system has been developed for deployment by diver or by ROV following witnessed trials at a tank in Aberdeen. The following describes some of the results from this trial.
The trial of the TSC ACSM Type 213 Stress probe Kare [3] using an ROV with a Schilling Arm (100kg capacity at full stretch) was conducted at the National Hyperbaric Centre in Aberdeen on 1st and 2nd July 1998. It was attended by representatives of Bureau Veritas (BV). The trial was conducted for the purpose of obtaining ACSM Type Approval and was conducted by RACAL and TSC.
Stress measurements were made on an I-Beam rig with two 1" threaded bars that were mounted along the beam and held by means of end plates. The bolts were threaded along the entire length. Hence measurements had to be made on the thread. Hydratight Limited hydraulic pullers were used to apply force to each bar. During the trials one bar was held tight at the same load whilst the other was subjected to various loads. Changing the load required removal of the I-Beam rig from the tank, changing the pressure, and replacing the I-Beam rig in the tank close to the ROV.
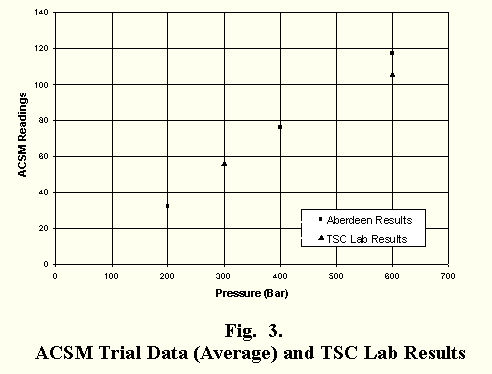
Measurements were repeated four times once the probe was positioned, by the ROV mounted arm, on the thread. The probe was placed alternately on the free end and mid point three times for each pressure. Figure 3 shows the average data plotted to show the variation of ACSM reading with load (pressure) together with some data collected manually by TSC Ltd. It can be seen that there was good agreement between the trails data and laboratory (manually deployed probe) data.
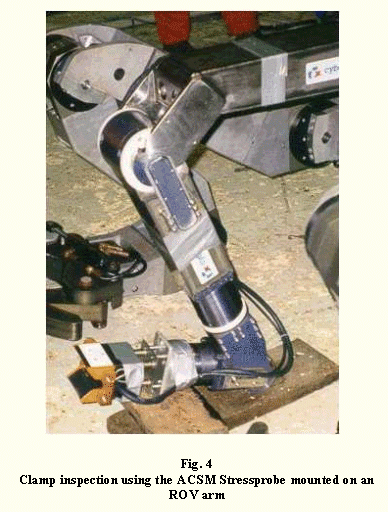
The EDICS trials by Dover, Rodriguez, Zhou, Chen and Kare [4] were a second opportunity to test the ACSM stress probe under realistic ROV deployment conditions. The trials were conducted at the IFREMER tank in Brest (France) on an anode clamp. The set up prior to launch is shown in Figure 4 and once more the bolt loads were successfully predicted.
The ACSM stress probe has been used offshore to measure the loads in clamp bolts several times. The most common deployment has been by divers. In practice the bolts are a mixture of fully threaded members or with threads only at each end. Both types have been successfully inspected [5]. In one service case it was also possible to monitor load changes during subsea preloading with the hydraulic pullers.
Stresses in beams
A similar exercise has been conducted with beam and column sections. Under static loading a beam will often experience bending and this can be used to advantage to give several related stress values. In a recent laboratory trial a universal column, 203x203 60 kg/m (nominal dimensions and weight per unit length), was subjected to three point bending in a servo-hydraulic test rig.
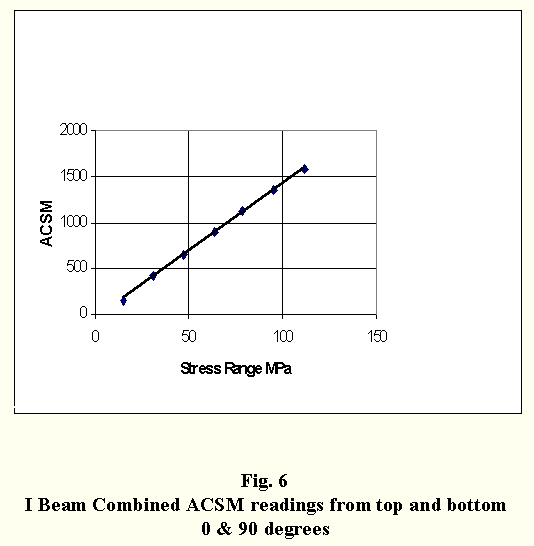
ACSM measurements were taken on the top and bottom faces of the beam at a series of different loads. A separate study was conducted on a flat plate cut from a similar beam to give the material calibration. The results for the top and bottom surface were combined to give the stress range and are shown in Figure 6. The flat plate data showed that the beam stress could be predicted to within a few percent.
Cyclic stress measurement
The monitoring of cyclic stress is easier in one sense as the residual stress is constant and does not interfere with the ACSM measurement. However long term drift becomes important and this has also been studied recently as described below.
Developments in electronic sensors and, data acquisition and transmission systems, and their reducing cost, has led to an increased concentration on the development of 'Structural Integrity Monitoring' (SIM) systems. SIM can be defined as an emerging branch of non-destructive evaluation aimed at the continuous monitoring of engineering structures. The aim is to record data relating to the integrity of the structure with the view to comparing it to a previously set trend based on the historical behaviour of the structure. Any major differences observed between the data should be investigated further as it could indicate the presence of a flaw in the structure.
Structural integrity monitoring is currently still limited by the number of sensors available. The suitability of a sensor will depend on its capability in measuring the dynamic behaviour of the structure with an acceptable level of reliability, sensitivity, accuracy and cost effectiveness.
The use of ACSM as a stress monitoring system was first investigated by Dover et al [6]. They identified that the main factors affecting the sensitivity of an SIM system are the frequency and magnitude of the dynamic response being measured. Long and short term drift were also considered important factors. On this basis they performed a limited number of short tests on a mild steel specimen under constant amplitude loading at various frequencies for cyclic stress range of 70 MPa. From their results they were able to conclude that although the equipment had not been optimised for dynamic stress measurement, ACSM exhibited great potential for use in this area.
Based on the work carried out by Dover et al [6] a more thorough investigation was carried out be de Leeuw [7] into the use of ACSM technology in Structural Integrity Monitoring applications. A large number of 24 hour, continuous tests were carried out on a mild steel specimen. These were designed to assess the performance of the ACSM technology under constant amplitude loading at various levels of mean stress, cyclic stress ranges. The cyclic frequency was limited to 0.5 Hz. Previous work has shown that there is no apparent relationship between cyclic frequency and the sensitivity of ACSM [6]. A total of 9.5 million data points were collected and analysed during this investigation, the main observations made are summarised below.
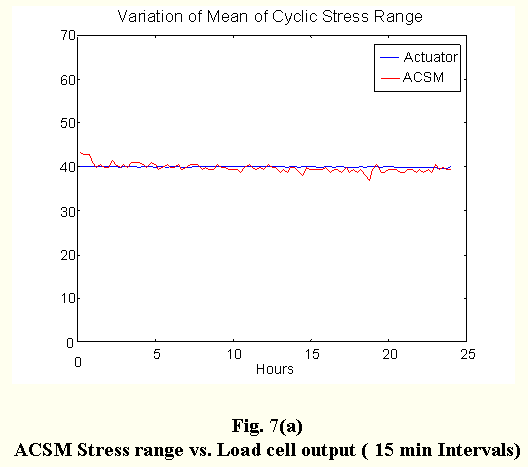
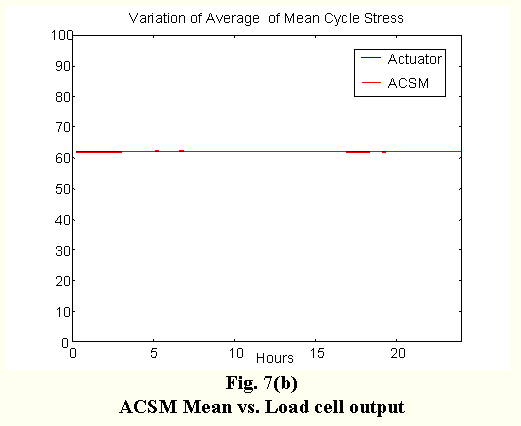
The analysis of the results was separated into monitoring of the cyclic mean stress Bx and monitoring of the cyclic stress range  for the various tests. In order to measure the medium term 'drift' the averages of mean Bx and
  on a fifteen-minute basis were plotted against time for the whole of the 24 hour tests periods. Sample plots from one of the tests are illustrated in Figures 7a and 7b.
Here the data obtained are compared directly to the output from the load cell. It can be seen that the ACSM measurement of stress coincides very well with the load cell output over the whole period of the test. More importantly however is the fact that over a 24 hour period there was no observed drift in either the mean stress or cycle amplitudes recorded. This was apparent for all the tests carried out in this investigation.
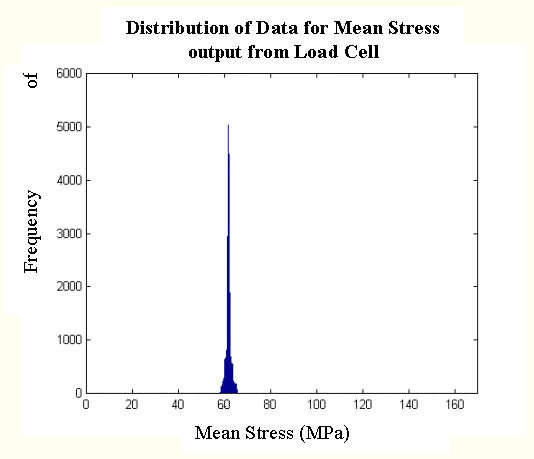
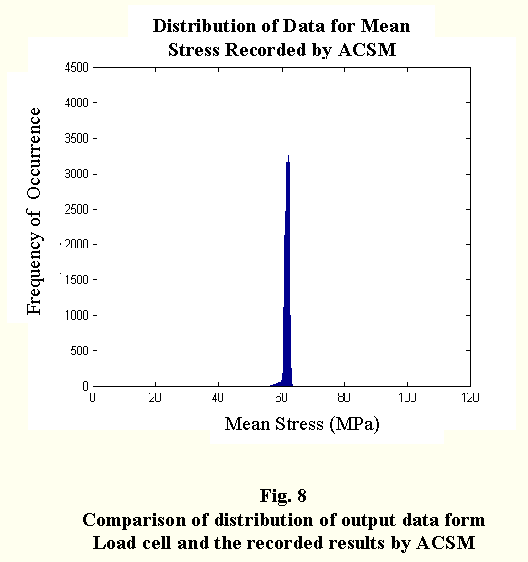
Figure 8 below shows a comparison between the distribution of recorded output from the load cell and the respective dynamic measurements made using ACSM for the cycle mean stress.
A very good correlation is shown between the two sets of data.
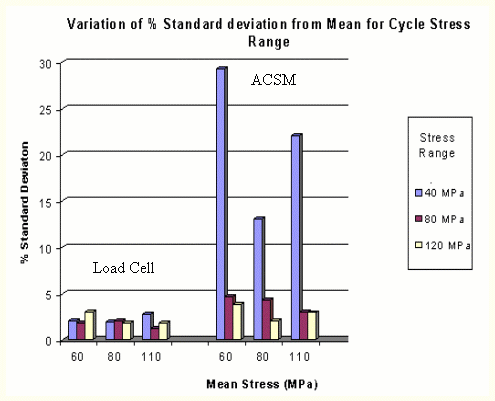
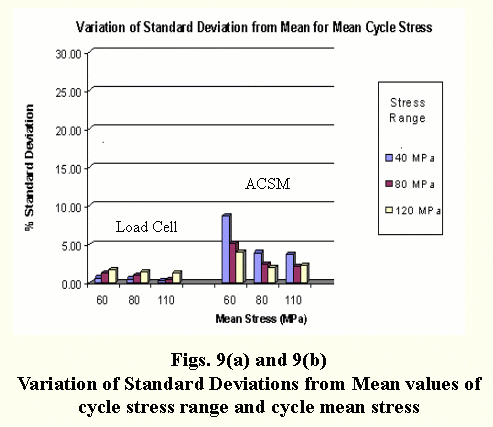
The data distributions were analysed for all the tests and were generally found to correlate well with each other. However, in order to enable more accurate comparisons to be made between data sets of different experimental tests, changes in the Standard Deviations as a percentage of the mean stresses or cycle amplitudes were observed. The results obtained are summarised for the monitored cycle mean and monitored stress range in figures 9(a) and 9(b) respectively.
Overall the ACSM technique was found to measure cyclic stresses quite accurately with very little deviation from the applied mean load or stress range. From figures 9(a) and 9(b) the only unsatisfactory set of results would be those obtained at the lowest monitored mean stress and cyclic stress range, both at 40 MPa. However when taking account data distribution plots for this test it becomes apparent the standard deviation does not always provide an accurate measure or the overall accuracy of the application.
It was observed from the data distributions that the cause of the high estimates for the standard deviations were caused by two small clusters of data located at either side of an otherwise very concentrated distribution. A number of reasons for this were considered including the effect of only carrying out one demagnetisation process over the whole period of the experiment. This was however quickly dismissed, as it did not seem to have any adverse effects on any of the other tests carried out. The more likely cause of the problem is a low sensitivity of the ACSM sensor making it difficult to accurately take measurements at lower stress ranges. This would increase the effect that any background noise may have on part of the data, which may be represented by the two clusters of data on either side of the mean.
 |
 |
From the results it could be concluded that the accuracy of the ACSM technique as a stress monitoring system was dependent on the applied cyclic stress range, improving at larger stress ranges. This was especially significant for the measurement of the amplitude of the cycle. It must be noted, however, that the system investigated was not designed for dynamic stress monitoring but for static measurements only. The monitoring results obtained using that ACSM technique are very promising at this early stage of development. The simplicity of the practical application of this application and the relative accuracy compared to other structural monitoring techniques in existence potentially make this a very attractive tool for this type of inspection. An area that needs to be addressed in conjunction with the development of the application is that of data manipulation. Research should aim at reducing data storage requirements, processing times and devising ways in which to present the date so that its can be easily interpreted by an operator.
CONCLUSIONS
The magnetic anisotropy introduced into ferrous steel by stress has been analysed and used in the design of probes for in-service non-contacting stress measurement. The ACSM Stressprobe has been used to measure the static load in subsea clamp bolts, beams and pipes or tubes. The use of the ACSM Stressprobe for Structural Integrity Monitoring has also been investigated. This showed that it was possible to monitor stress cycles over long periods of time.
ACKNOWLEDGMENTS
The authors would like acknowledgement the support of TSC Inspection Systems Ltd during these studies.
REFERENCES
1 Zhou, J. and Dover, W. D., Electromagnetic induction in anisotropic half-space and electromagnetic stress model, Journal of Applied Physics, Vol.83, No4, 1998, pp1694-1701.
2. Han, S., Brennan, F.P. and Dover W.D., "Development of the ACSM Model for Magnetostriction Behaviour of Mild Steel under Orthogonal Magnetic Fields", Submitted for publication in Journal of Strain Analysis March 2001.
3 Report on ACSM trial at NHC Aberdeen, 1st July 1998, R F Kare, TSC Internal report
4 Dover, W.D., Rodriguez, E., Chen, K., Zhou, J. and Kare, R.F., "ACSM trial on an anode clamp (EDICS trial Brest Dec 1997)", EDICS Final Report, CEC, 1998.
5 Brennan, F.P., "A Remotely Deployed Alternating Current Stress Measurement System for the Subsea Maintenance of Anode Clamps", Proceedings of the First International Conference on Non-Destructive Evaluation in the Gulf, Doha, State of Qatar, pp1-15, November 1999.
6 Dover W D, Brennan F P and Etube L S, "Structural Integrity Monitoring using Alternating Current Field Measurements", Paper presented at 5th International Conference on Engineering Structural Integrity Assessment, Churchill College, Cambridge, September 2000
7 De Leeuw B, "Assessment of a Structural Integrity Monitoring Device", MSc Thesis, Dept. Mechanical Engineering, UCL, September 2000.
articles index

